maestro-sdk-docs
Maestro Unity SDK Guide
Requirements
In order for your Contact CI Maestro to be able to connect to your computer you will need to install our software found here.
This will install the Contact CI Manager and backing Contact CI Service required for your haptic devices. The Manager manages all your Contact CI haptic devices, and allows more direct control over them and the service itself.
SDK
The Unity SDK provides compatibilty and smooth integration of Maestro with new and existing XR scenes.
This includes:
- Prefabs for Ultraleap and Meta Quest hand-tracking compatibility
- The ability to customize force feedback and vibrotactile haptics per object in scene
- An example scene showcasing interactions and haptics named “Sandbox”
This Unity SDK is designed to be tracking-agnostic, though we provide prefab rigs for Ultraleap and Meta Quest hand tracking.
Compatibility
The Unity SDK provides the following prefab rigs for ease of integration:
- [MaestroUltraleapRig] - Provides support for:
- Leap Motion Controller
- Stereo IR 170
- Ultraleap 3Di
- [MaestroOculusRig]
- Meta Quest 1/2/Pro
- [MaestroVarjoRig]
- Ultraleap hand tracking systems integrated into Varjo headsets.
It is also possible to roll your own configuration using the SDK components available.
The SDK by default uses Standard materials, but includes URP materials and prefab variants for convenience. For instance if you wanted to use the [MaestroUltraleapRig] prefab with URP, there’s a variant already made called [MaestroUltraleapRig_URP].
Setup
Before installing the Unity SDK package, you’ll need to:
- Add a scoped registry entry for Ultraleap’s Unity SDK so that the Package Manager can resolve the dependency. You can do this by following the steps listed here.
- Add a scoped registry entry for Meta’s core SDK package so that the Package manager can resolve the dependency:
- Navigate to Edit -> Project Settings -> Package Manager and enter the following:
- Name:
Meta - URL:
https://npm.developer.oculus.com - Scope:
com.meta.xr.sdk.core - Alternatively, you can follow Meta’s instructions here
- Name:
- Navigate to Edit -> Project Settings -> Package Manager and enter the following:
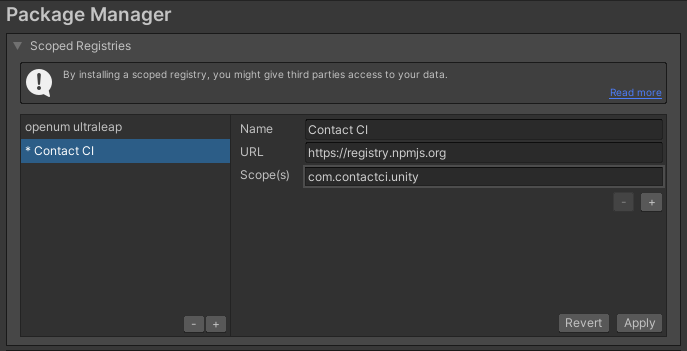
You can grab our package via the Package Manager by adding a scoped registry. Navigate to Edit -> Project Settings -> Package Manager and enter the following:
- Name:
Contact CI - URL:
https://registry.npmjs.org - Scope:
com.contactci.unity - e.g.
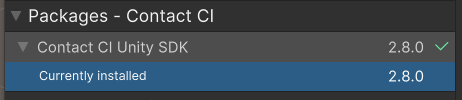
- Then you should be able to install the package listed under “My Registries”:
Included Sample
Once you’ve installed the package, you can navigate to the “Samples” section within the Package Manager listing to import the Sandbox sample scene:
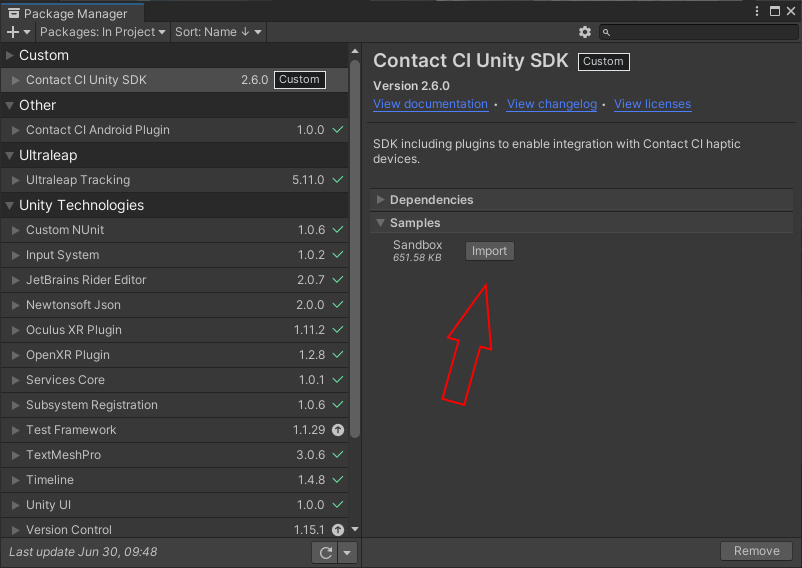
The sandbox scene has a variety of interactions including picking up objects, pushing buttons, and finger painting.
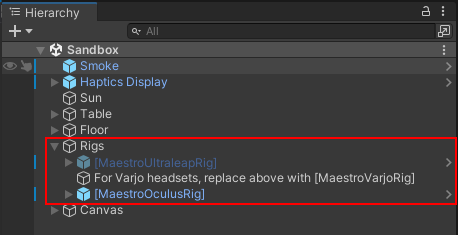
In order to run the scene, first ensure that you have enabled the rig that corresponds to your target platform and XR setup. There are currently two rigs: one for Ultraleap hand tracking support and another for Meta Quest 1/2 hand tracking support.
Integrating Maestro / Usage
The easiest way to add Maestro compatibility to a Unity scene is by utilizing the provided prefabs: [MaestroUltraleapRig] and [MaestroOculusRig]. These can be found under Contact CI Unity SDK/Runtime/Core/Prefabs/ in the Packages folder after installing from a tarball. Simply drag the appropriate prefab into the hierarchy.
There is also a [MaestroVarjoRig] provided to be used specifically for Varjo headsets with integrated Ultraleap hand tracking.
Default Haptics
By default, any object that is collidable within the scene will provides haptics when touched. The default haptics can be configured via MaestroManager. MaestroManager can be found on the root of the provided prefabs.
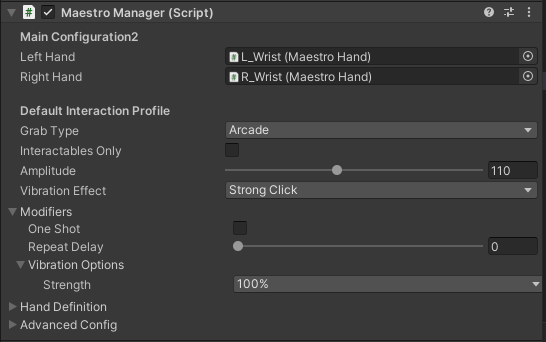
Under Default Interaction Profile, you can configure the default haptics and configuration for the scene:
Grab Type- Right nowArcadeis the only option. More to come soon!Arcade- Simplified pickup based on finger curl, once fingers are curled enough everything within a certain radius is grabbed.
Interactables Only- Disables these default haptic settings. Only objects that have aMaestroInteractablewill have haptics when touched.Amplitude- Controls the strength of force feedback. The value ranges from0to255, with0being no pull and255being full force feedback.Vibration Effect- The vibration effect to be applied. Can be one of two kinds:Vibration Effect- Use a predefined effect. DisplaysVibration Optionsif necessary.Vibration Amplitude- Directly control the vibration strength with an0to1.0amplitude.
Modifiers- Modifiers to apply to the vibration effect.One Shot- Only play the effect once rather than continuously.Repeat Delay- If playing continuously, the delay in milliseconds before the effect repeats.
Vibration Options- Options corresponding to the selected vibration effect. Typically the strength of the effect. More complicated effects may have additional options available. Unused if using vibration amplitude.
Note that if Interactables Only is set to true, the default effect will not be available as all effects are then controlled by the MaestroInteractables on each individual object.
MaestroInteractable
To customize the haptics for a given collidable gameobject, utilize the MaestroInteractable script. The fields available will look very similar to those found on MaestroManager (documented here).
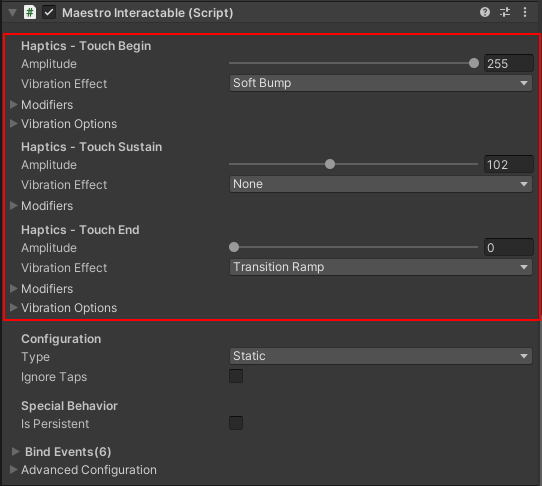
MaestroInteractable has three separate haptic effects (Touch Begin, Touch Sustain, and Touch End) to be played when the user initially touches the object, continues to touch it, and stops touching it respectively. Since haptics are based on contact, by default the Touch End effect will not be felt. By setting the MaestroInteractable to IsPersistent, a duration can be configured for which effects will continue to be felt after stopping contact, allowing the Touch End effect to be used.
You can also control how an object can be manipulated using the Type field under Configuration:
Static- Unable to be picked upOne hand grab- Can be picked up using either individual handTwo hand- Requires both hands to pick up
This script also defines a few events that may be used to easily create complex interactions:
- Events
On Grab- Called after the object is grabbed.On Release- Called after the object is released.
- Finger events
On Touch(FingerCollider) - Called when a finger touches the objectUn Touch(FingerCollider) - Called when a finger stops touching the objectWhile Touch(FingerCollider) - Called while a finger touches the objectOn Trigger Touch(FingerCollider) - Called when a finger touches a triggerUn Trigger Touch(FingerCollider) - Called when a finger stops touching a triggerWhile Trigger Touch(FingerCollider) - Called while a finger touches a trigger
FingerCollider
Script controlling the colliders used for detecting hand collisions. Automatically spawned by MaestroHand.
Mainly used for finger events, index can be used to figure out which part of the hand was collided with.
MaestroIndex wraps two enums describing the location on the hand:
WhichFinger- which finger/part of the hand the collider corresponds to.ThumbIndexMiddleRingPalm
PointOnFinger- What bone/joint the collider corresponds to. Digits refer to bones, while the others refer to joints/tip.TipMiddleBaseProximalDigitDistalDistalDigit
FingerColliders are spawned according to the Hand Definition on MaestroManager/MaestroHand. By default, MaestroManager controls the sizing for both hands but selecting Override Settings on MaestroHand allows the hands to be defined separately.
Custom Rig Setup
In the event the provided rigs are insufficient, such as when adding support for a custom hand tracking solution, the user will need to provide several key points on the hand skeleton for filling out the hand and spawning colliders. The following picture describes the rough location of these keypoints and the terminology used to refer to them:
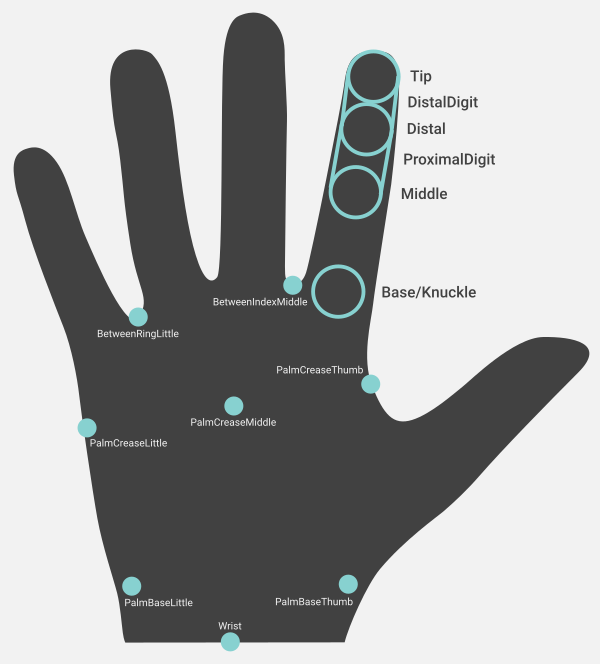
The transforms provided tell MaestroHand where to spawn FingerColliders. The transforms provided for key points on the palm are used to generate an approximation of the palm made up of several prisms. The radius of spawned FingerColliders corresponding to the Hand Sizing section of MaestroManager’s Hand Definition section (or MaestroHand’s if Override Settings is toggled).
Troubleshooting
I see a warning on my screen or in the headset saying “Service Disconnected!”
The Contact CI Service needs to be installed and running.
If you need to install it, see Requirements above. If it is installed but not running, either:
- Run the Contact CI Manager and use the dropdown on the left to
Start Service - Or, start the Contact CI Service directly with Run >
services.msc> Contact CI Service
Alternatively, the warnings can be disabled entirely if the ToggleOverlays input is bound.
My gloves don’t connect when running on Meta Quest 2!
Make sure your Maestros are paired to your Quest 2 via the Settings -> Devices -> Bluetooth menu.
Running my scene causes Unity to terminate!
It should be noted that the DLLs used by our SDK are 64-bit only. As such, if the Unity platform settings are set to Any CPU or x86 execution will halt.
To address this, you may find all DLLs under Contact CI Unity SDK/Runtime/Core/_DLLs. Set each DLL’s CPU setting to x86_64. If you are performing builds, this will also have to be done so the DLLs are included with 64-bit builds, and excluded for 32-bit builds.
You may also have to enable Load on startup under Plugin load settings. The Unity editor will have to be restarted for this to take effect.
My Quest .apk doesn’t have hand tracking! Starting the app gives a “Switch to Controllers” prompt.
In the headset itself, be sure you have hand tracking enabled in your settings, under Hands and Controllers.
In Unity, make sure your Oculus project settings don’t have Hand Tracking Support set to Controllers Only. Setting it to Hands Only is recommended. These settings can be found on the main OVRManager component in the scene or under Assets/Oculus/OculusProjectConfig.asset.
An error occurred while resolving packages: . . . com.contactci.unity has invalid dependencies or related test packages: com.ultraleap.tracking (dependency): Package [com.ultraleap.tracking@5.11.0] cannot be found
You need to add the scoped registry for Ultraleap hand tracking support, see Setup above.
error CS0246: The type or namespace name ‘OVRManager’ could not be found (are you missing a using directive or an assembly reference?)
You need to import the Oculus Integration for full Quest hand tracking support.
When running the sandbox sample scene, the background environment is just black
On the MaestroOculusRig prefab instance, on the OVRManager component, ensure that “Passthrough Capability Enabled” is checked under Quest Features -> General tab.
Please contact us at support@contact.ci with any questions.